Aug 222012
 

Implementing high availability (HA) at the VMware layer is great. Why would you need anything else? Well, as useful as the solution is — and it does help to protect against some types of failures — VMware HA alone simply doesn’t cover all the bases.

According to Gartner Research, most unplanned outages are caused by application failure (40 percent of outages) or admin error (40 percent). Hardware, network, power, or environmental problems cause the rest (20 percent total). VMware HA focuses on protection against hardware failures, but a good application-clustering solution picks up the slack in other areas. Here are a few things to consider when architecting the proper HA strategy for your VMware environment.

Time to repair detail

Shorten outages with application-level monitoring and clustering. What about recovery speed? In a perfect world, there would be no failures, outages or downtime. But if an unplanned outage does occur, the next best thing is to get up and running and again — fast. This equation represents the total availability of your environment:

As you can see, detection time is a crucial piece of the equation. Here’s another place where VMware HA alone doesn’t quite cut it. VMware HA treats each virtual machine (VM) as a “black box” and has no real visibility into the health or status of the applications that are running inside. The VM and OS running inside might be just fine, but the application could be stopped, hung, or misconfigured, resulting in an outage for users.

Even when a host server failure is the issue, you must wait for VMware HA to restart the affected VMs on another host in the VMware cluster. That means that applications running on those VMs are down until 1) the outage is detected, 2) the OS boots fully on the new host system, 3) the applications restart, and 4) users reconnect to the apps.

By clustering at the application layer between multiple VMs, you are not only protected against application-level outages, you also shorten your outage-recovery time. The application can simply be restarted on a standby VM, which is already booted up and waiting to take over. To maximize availability, the VMs involved should live on different physical servers — or even better, separate VMware HA clusters or even separate datacenters!

Eliminate storage as a potential single point of failure (SPOF). Traditional clustering solutions, including VMware HA, require shared storage and typically protect applications or services only within a single data center. Technically, the shared-storage device represents an SPOF in your architecture. If you lose access to the back-end storage, your cluster and applications are down for the count. The goal of any HA solution is to increase overall availability by eliminating as many potential SPOFs as possible.

So how can you augment a native VMware HA cluster to provide greater levels of availability? To protect your entire stack, from hardware to applications, start with VMware HA. Next, you need a way to monitor and protect the applications. Clustering at the application level (i.e., within the VM) is the natural choice. Be sure to choose a clustering solution that supports host-based data replication (i.e., a shared-nothing configuration) so that you don’t need to go through the expense and complexity of setting up SAN-based replication. SAN replication solutions also typically lock you into a single storage vendor. On top of that, to cluster VMs by using shared storage, you generally need to enable Raw Device Mapping (RDM), which means that you lose access to many powerful VMware functions, such as vMotion.

Going with a shared-nothing cluster configuration eliminates the storage tier as an SPOF and at the same time allows you to use vMotion to migrate your VMs between physical hosts – it’s a win/win. A shared-nothing cluster is also an excellent solution for disaster recovery because the standby VM can reside at a different data center.

Cover all the bases. Application-failover clustering, layered over VMware HA, offers the best of both worlds. You can enjoy built-in hardware protection and application awareness, greater flexibility and scalability, and faster recovery times. Even better, the solution doesn’t need to break the bank.

 Posted by at 8:13 am
Aug 132012
 

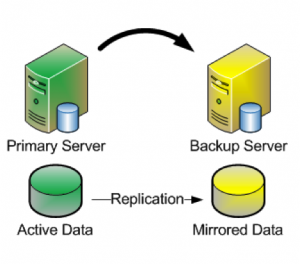
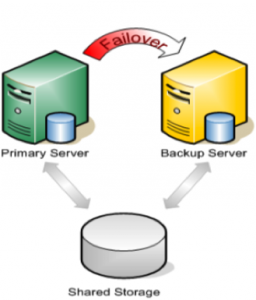
When most people think about setting up a cluster, it usually involves two or more servers, and a SAN – or some other type of shared storage.  SAN’s are typically very costly and complex to setup and maintain. Also, they technically represent a potential Single Point of Failure (SPOF) in your cluster architecture.  These days, more and more people are turning to companies like Fusion-io, with their lightning fast ioDrives, to accelerate critical applications.  These storage devices sit inside the server (i.e. aren’t “shared disks”), and therefore can’t be used as cluster disks with many traditional clustering solutions.  Fortunately, there are solutions out there that allow you form a failover cluster when there is no shared storage involved – i.e. a “shared nothing” cluster.

Traditional Cluster   “Shared Nothing” Cluster


When leveraging data replication as part of a cluster configuration, it’s critical that you have enough bandwidth so that data can be replicated across the network just as fast as it’s written to disk.  The following are tuning tips that will allow you to get the most out of your “shared nothing” cluster configuration, when high-speed storage is involved:

Network

  • Use a 10Gbps NIC: Flash-based storage devices from Fusion-io (or other similar products from OCZ, LSI, etc) are capable of writing data at speeds in the HUNDREDS (750+) of MB/sec or more.  A 1Gbps NIC can only push a theoretical maximum of ~125 MB/sec, so anyone taking advantage of an ioDrive’s potential can easily write data much faster than could be pushed through a 1 Gbps network connection.  To ensure that you have sufficient bandwidth between servers to facilitate real-time data replication, a 10 Gbps NIC should always be used to carry replication traffic
  • Enable Jumbo Frames: Assuming that your Network Cards and Switches support it, enabling jumbo frames can greatly increase your network’s throughput while at the same time reducing CPU cycles.  To enable jumbo frames, perform the following configuration (example from a RedHat/CentOS/OEL linux server)
    • ifconfig <interface_name> mtu 9000
    • Edit /etc/sysconfig/network-scripts/ifcfg-<interface_name> file and add “MTU=9000” so that the change persists across reboots
    • To verify end-to-end jumbo frame operation, run this command: ping -s 8900 -M do <IP-of-other-server>
  • Change the NIC’s transmit queue length:
    • /sbin/ifconfig <interface_name> txqueuelen 10000
    • Add this to /etc/rc.local to preserve the setting across reboots

TCP/IP Tuning

  • Change the NIC’s netdev_max_backlog:
    • Set “net.core.netdev_max_backlog = 100000” in /etc/sysctl.conf
  • Other TCP/IP tuning that has shown to increase replication performance:
    • Note: these are example values and some might need to be adjusted based on your hardware configuration
    • Edit /etc/sysctl.conf and add the following parameters:
      • net.core.rmem_default = 16777216
      • net.core.wmem_default = 16777216
      • net.core.rmem_max = 16777216
      • net.core.wmem_max = 16777216
      • net.ipv4.tcp_rmem = 4096 87380 16777216
      • net.ipv4.tcp_wmem = 4096 65536 16777216
      • net.ipv4.tcp_timestamps = 0
      • net.ipv4.tcp_sack = 0
      • net.core.optmem_max = 16777216
      • net.ipv4.tcp_congestion_control=htcp

Typically you will also need to make adjustments to your cluster configuration, which will vary based on the clustering and replication technology you decide to implement.  In this example, I’m using the SteelEye Protection Suite for Linux (aka SPS, aka LifeKeeper), from SIOS Technologies, which allows users to form failover clusters leveraging just about any back-end storage type: Fiber Channel SAN, iSCSI, NAS, or, most relevant to this article, local disks that need to be synchronized/replicated in real time between cluster nodes.  SPS for Linux includes integrated, block level data replication functionality that makes it very easy to setup a cluster when there is no shared storage involved.

SteelEye Protection Suite (SPS) for Linux configuration recommendations:

  • Allocate a small (~100 MB) disk partition, located on the Fusion-io drive to place the bitmap file.  Create a filesystem on this partition and mount it, for example, at /bitmap:
    • # mount | grep /bitmap
    • /dev/fioa1 on /bitmap type ext3 (rw)
  • Prior to creating your mirror, adjust the following parameters in /etc/default/LifeKeeper
    • Insert: LKDR_CHUNK_SIZE=4096
      • Default value is 64
    • Edit: LKDR_SPEED_LIMIT=1500000
      • (Default value is 50000)
      • LKDR_SPEED_LIMIT specifies the maximum bandwidth that a resync will ever take — this should be set high enough to allow resyncs to go at the maximum speed possible
    • Edit: LKDR_SPEED_LIMIT_MIN=200000
      • (Default value is 20000)
      • LKDR_SPEED_LIMIT_MIN specifies how fast the resync should be allowed to go when there is other I/O going on at the same time — as a rule of thumb, this should be set to half or less of the drive’s maximum write throughput in order to avoid starving out normal I/O activity when a resync occurs

From here, go ahead and create your mirrors and configure the cluster as you normally would.